I have a 13″ MacBook Pro with Retina display that I use as my main computer for everything I do at home, and I thought it’d be good enough for gaming. However, I started playing Counter-Strike: Global Offensive, and there is noticeable lag every now and then, especially in big maps that have a lot of objects to render. I had to lower the game resolution to somewhere around 720p, and only had the graphics settings on medium. Even then, I wasn’t happy with the low FPS I was getting.
This made me rethink about using a MacBook as my main machine. Since it was on my desk 99% of the time anyway, I should just use a desktop computer, right? I wanted a more powerful machine that could handle gaming, I still wanted to use Mac OS X, and I wanted it to be cheap (price wise). So what better thing to do than to build my own Hackintosh!?
The first thing I did was to head over to tonymacx86.com to check out this article: Building a CustoMac: Buyer’s Guide May 2014. That article provides a list of the easiest and best supported hardware options for installing Mac OS X.
The Parts
Like I mentioned above, I didn’t want to spend a ton of money on expensive parts, but still wanted it good for gaming. So the parts that I picked out are:
The total came out to be $1,259.55… which is a just little above what I paid for my MacBook.
The Installation
For the most part, it was pretty straightforward using this guide: UniBeast: Install OS X Mavericks on Any Supported Intel-based PC
To summarize my installation steps:
- Download Mavericks from the App Store on existing MacBook.
- Plug in a USB flash drive to make an OS X installer.
- Make it 1 partition, set the option to Master Boot Record, format it to Mac OS Extended (Journaled).
- Run Unibeast and let it put the Mavericks installer in the flash drive.
- Copy MultiBeast into the finished flash drive.
- Turn on the newly built computer and change some of the UEFI settings.
- Loaded Optimized Defaults.
- Set X.M.P. Memory Profile to Profile1.
- Change XHCI mode to Auto instead of Smart Auto.
- Set EHCI to Enabled.
- Set XHCI to Enabled.
- Boot up from the USB flash drive.
- Open Disk Utility and format the SSD.
- Create 1 partition, Option: GUID Partition, Format: Mac OS Extended (Journaled).
- Install OS X Mavericks to the SSD.
- Now OS X should be running, open MultiBeast to install some drivers and tweaks to make the Hackintosh run better.
The End
This entire process took about 3.5 hours. Here’s the rough timeline of my steps:
- I started building the computer around 5pm and finished building around 6:30pm.
- The UniBeast part took ~20 minutes. I should’ve had this step running while I was building the computer.
- Changing the UEFI settings took ~10 minutes. I was getting a kernel panic while booting into the installer, so I had to search online to see which settings worked.
- Installing OS X took ~20 minutes.
- MultiBeast took ~10 minutes. I looked online to see which checkboxes other people with a similar build had enabled.
- I transferred Counter-Strike: Global Offensive files (~8GB) from my MacBook to my Hackintosh, which took ~20 minutes.
- By 8:30pm, I got on Steam and was able to play Counter-Strike in 1080p on high graphics settings. And. It. Was. Smooth!
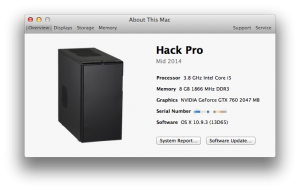
Overall, it was a pretty painless process and I am very happy with my new Hackintosh.
P.S. Although the Logitech C920 webcam captures crispy clear images, it has a TERRIBLE microphone… it makes me sound muffled and far away. I will definitely replace this webcam with one that has a better mic, which is what I really care about because I talk online with my friends in Mumble everyday.

